Auto Layouts, in the editor’s Layout panel, has the Tella Agent add a sequence of layouts to a clip in an editing style picked for your content. It uses Credits.
Auto Layouts, in the editor’s Layout panel, analyzes a clip’s transcript and video and adds a sequence of layouts (camera bubbles, screen-only beats, camera cutaways, side-by-side splits, and TV-presenter compositions) in an editing style that fits your content. It works on one clip at a time. The Tella Agent does the work, so each generation uses Credits.
How to generate auto layouts
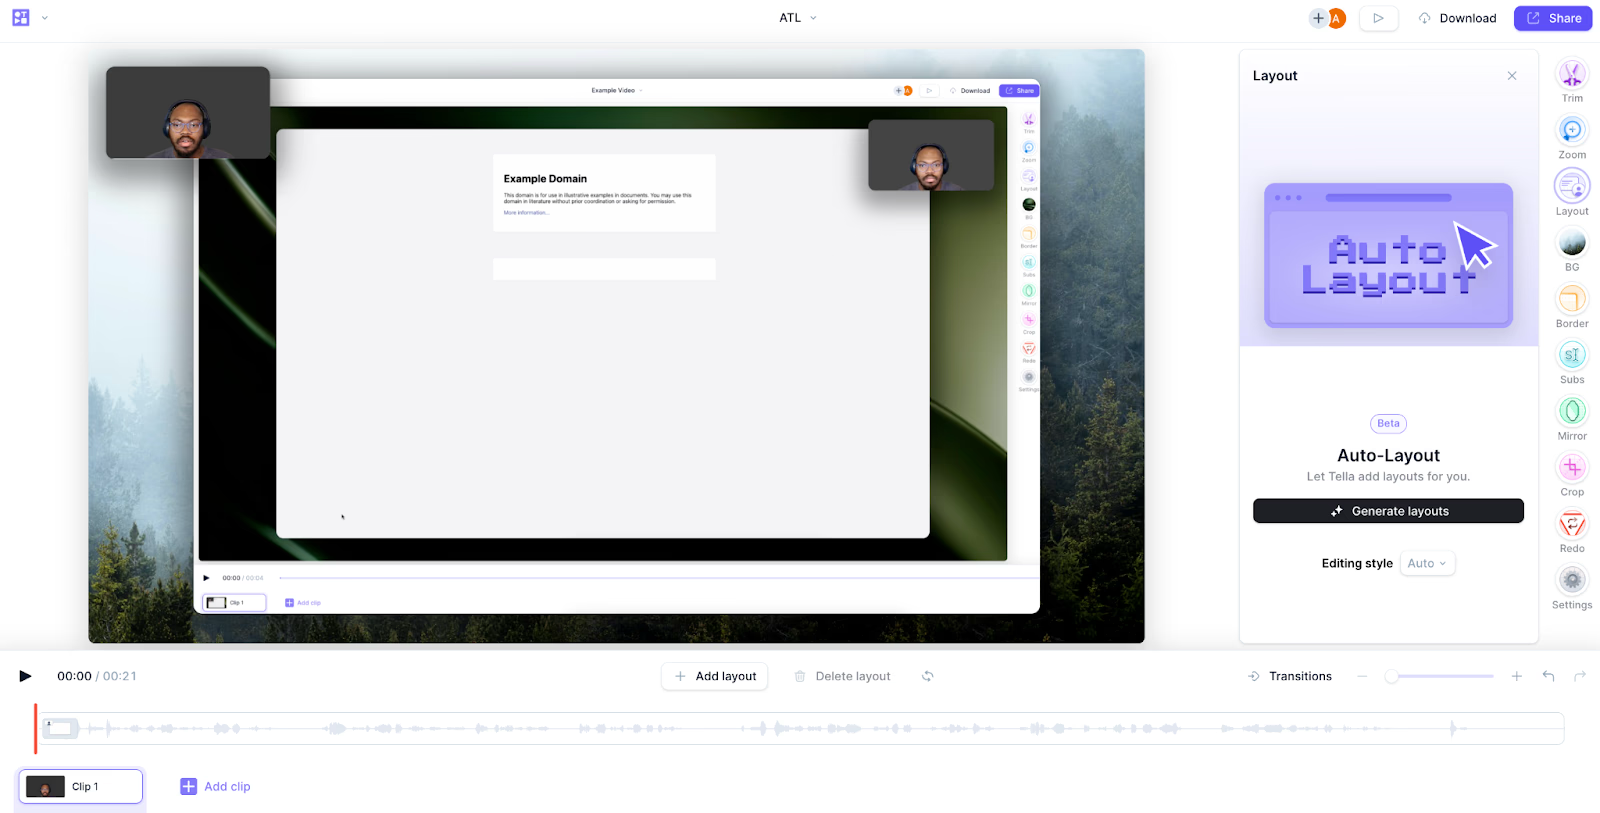
Open your video in the editor, click the clip you want on the timeline (or move the playhead into it), and click Layout in the left toolbar.
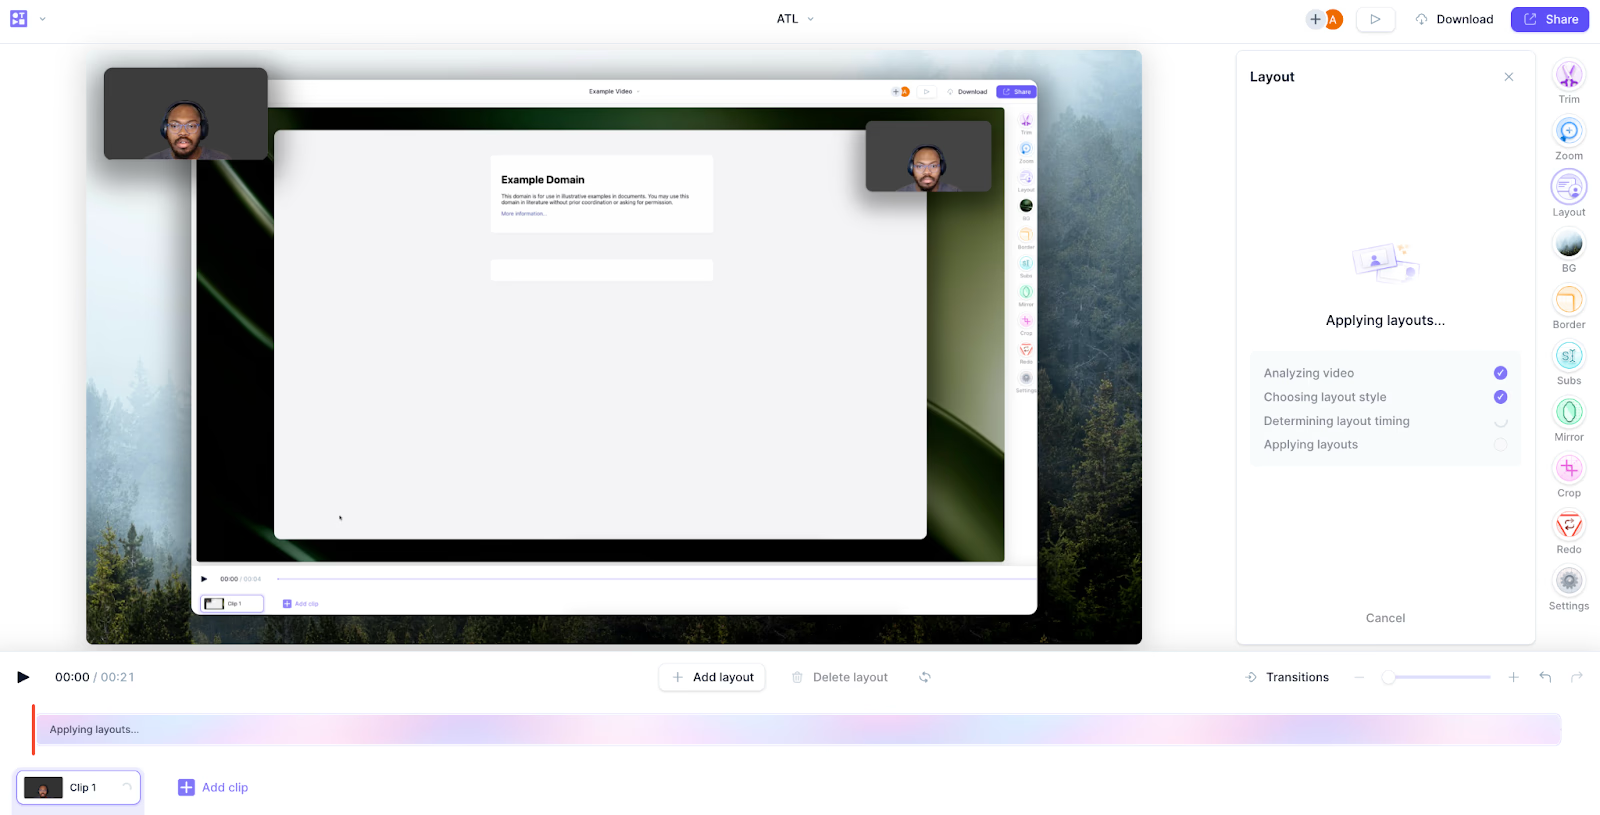
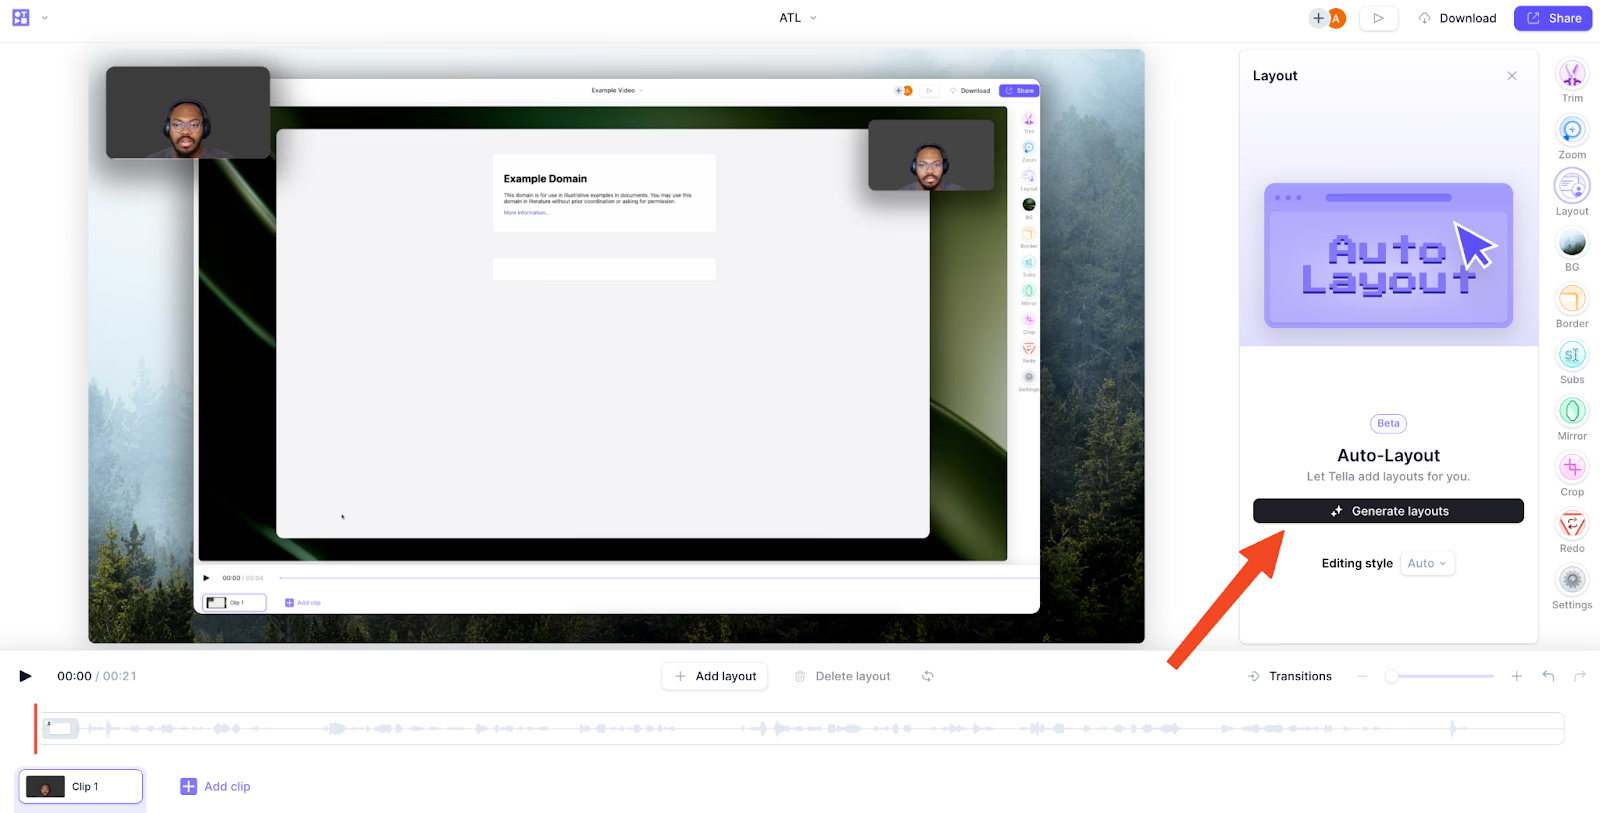
At the bottom of the panel, next to Auto Layouts, click Generate. There’s no style to choose; Tella picks one from your clip’s content.The Tella Agent chat opens with a request for auto layouts on your clip, and the agent applies the layouts as it works.
Wait for the generation to complete.
Review the result. The new layouts show on the clip in the timeline, and the agent’s reply in the chat lists what it changed.
What can I do after generating?
After auto layouts finishes, you can:
Click Generate again for an alternative take, or tell the agent in the chat what didn’t work well and it adjusts the layouts
Delete individual layouts while keeping the rest
Adjust the start and end of any layout
Undo or redo
Windows: Ctrl + Z to undo, Ctrl + Shift + Z or Ctrl + Y to redo
macOS: Cmd + Z to undo, Cmd + Shift + Z or Cmd + Y to redo
Does auto layouts use credits?
Yes. Auto layouts runs through the Tella Agent, so every generation and regeneration spends your workspace’s Credits, the same as sending the agent a message.Hover over the round credits icon next to the Auto Layouts title to see your workspace’s balance, for example Requires credits: 2,300 available.If your workspace is out of credits, the agent can’t run auto layouts until a workspace owner adds more or your monthly allowance resets. You can still add and edit layouts by hand.
Which editing styles are available?
Tella picks one of these styles based on what you say and show. The styles available depend on your clip’s recording type and canvas size.
Demo: high-energy proof + commentary; mixes screen reveals, camera cutaways, and punch-ins for product walkthroughs, page critiques, and feature launches
Tutorial: procedural, step-by-step instruction where the viewer needs to follow exact clicks, typing, and configuration
Presentation: speaker-led talks, pitches, recaps, and lessons; includes a hosted TV show variant on landscape canvases that frames the speaker like a presenter
Intro & Outro: only bookends the clip with a camera-led intro and outro and leaves the middle untouched
Image B-roll
Auto layouts doesn’t add AI-generated image B-roll. To cut away to an image or video, add media (B-roll) to any layout after generating.
Which recordings and canvas sizes are supported?
Auto layouts works with:
Landscape (16:9): two-track (camera + screen), screen-only, and camera-only recordings
Portrait (9:16): two-track, screen-only, and camera-only recordings
Square (1:1) and round: two-track and camera-only recordings
Compositions adapt to the canvas: portrait clips use a presenter-forward split, and landscape presentations can use the TV-presenter framing.
Best practices
Start with a clean slate: auto layouts works best on raw, unedited recordings
One clip at a time: generate layouts per clip; layouts won’t generate across an entire video in one pass
What to expect
Variability: each generation can produce slightly different results
Pacing: overrides are used as exceptions to the base layout, so most of the clip stays on the base composition with timed accents around important moments
Processing time: longer clips take longer to generate
What are the limits of auto layouts?
Make all crop changes before running auto layouts. Cropping afterwards affects every layout and can produce unexpected results
After cropping, you can’t update the generated layouts
Last modified on November 19, 2026
Was this page helpful?
{"docsConfig":{"theme":"mint","$schema":"https://mintlify.com/schema.json","name":"Tella","colors":{"primary":"#8278FA","light":"#B1AAFC","dark":"#5E51F8"},"logo":{"light":"https://mintcdn.com/tella/znRZoQ3e3rlGBTT2/logo-light.svg?fit=max\u0026auto=format\u0026n=znRZoQ3e3rlGBTT2\u0026q=85\u0026s=dd044b03efe593b53353a039bfb31fbf","dark":"https://mintcdn.com/tella/znRZoQ3e3rlGBTT2/logo-dark.svg?fit=max\u0026auto=format\u0026n=znRZoQ3e3rlGBTT2\u0026q=85\u0026s=88323f6b0165ce29c00e3a1d80c82fe3"},"favicon":"https://mintcdn.com/tella/munSRGpiNeMNXMvc/favicon.svg?fit=max\u0026auto=format\u0026n=munSRGpiNeMNXMvc\u0026q=85\u0026s=1b25a4dc5d9a41a1a9238eda432a0cb6","api":{"params":{"expanded":"all"},"playground":{"display":"interactive","proxy":true},"examples":{"defaults":"all","prefill":true},"url":"full","mdx":{"auth":{"method":"bearer"}}},"navbar":{"primary":{"type":"button","label":"Open Tella","href":"https://www.tella.com/videos"}},"footer":{"socials":{"github":"https://github.com/tellahq","x":"https://x.com/tellahq","linkedin":"https://linkedin.com/company/tellahq","youtube":"https://youtube.com/@tellahq","website":"https://tella.com","instagram":"https://instagram.com/tellahq"},"links":[{"header":"Tella features","items":[{"label":"Video trimming","href":"https://www.tella.com/features/video-trimming"},{"label":"Viewer downloads","href":"https://www.tella.com/features/viewer-download"},{"label":"4K export","href":"https://www.tella.com/features/4k-export"},{"label":"AI editing","href":"https://www.tella.com/features/ai-editing"},{"label":"Custom branding","href":"https://www.tella.com/features/custom-branding"},{"label":"Upload video","href":"https://www.tella.com/features/video-upload"},{"label":"Video clips","href":"https://www.tella.com/features/clips"},{"label":"Custom backgrounds","href":"https://www.tella.com/features/custom-backgrounds"},{"label":"All features","href":"https://www.tella.com/features"}]}]},"seo":{"paths":[{"path":"help","metatags":{"canonical":"https://www.tella.com"}},{"path":"changelog","metatags":{"canonical":"https://www.tella.com"}}]},"styling":{"eyebrows":"breadcrumbs","codeblocks":"system","latex":false},"contextual":{"options":["copy","assistant","view","chatgpt","claude","perplexity","grok","mcp","add-mcp","cursor","vscode"],"display":"header"},"interaction":{"drilldown":true},"metadata":{"timestamp":true},"markdown":{"schema":true},"navigation":{"global":{"anchors":[{"anchor":"Changelog","icon":"clock-rotate-left","href":"/changelog"},{"anchor":"Community","icon":"users","href":"https://community.tella.tv"},{"anchor":"System Status","icon":"signal","href":"https://status.tella.com"},{"anchor":"Contact Support","icon":"envelope","href":"mailto:support@tella.com"},{"anchor":"Debug","icon":"bug","href":"/help/support/debug-camera-and-microphone-issues"}]},"pages":[]}},"deployment":{"deploymentMetadataValue":{"subdomain":"tella","hasAudioNarration":false,"actualSubdomain":"tella","customDomains":["www.tella.com"],"gitSource":{"type":"github","owner":"tellahq","repo":"tella-fusion","deployBranch":"main","contentDirectory":"packages/core/webapp/docs","isPrivate":true,"mountPath":"","label":""},"feedback":{"thumbs":true,"contextualFeedback":{"allowEmail":true},"agentFeedback":true},"entitlements":{"AI_CHAT":{"status":"ENABLED"},"WEB_MCP":{"status":"ENABLED"},"NARRATION":{"status":"ENABLED"}},"buildId":"6b00ef34c953c2aa6bb620f0","clientVersion":"0.0.4270","searchFilterCounts":[{"language":"default","tag":"Help Center","count":272},{"language":"default","tag":"Developers","count":216},{"language":"default","tag":"API Reference","count":163},{"language":"default","tag":"Edit","count":75},{"language":"default","tag":"Clips","count":63},{"language":"default","tag":"Share and embed","count":41},{"language":"default","tag":"Videos","count":40},{"language":"default","tag":"MCP Tools","count":35},{"language":"default","tag":"Troubleshooting and support","count":33},{"language":"default","tag":"Account and workspace","count":31}],"searchSettings":{"isFiltersEnabled":true,"maxResults":15,"showContentSnippets":true,"fullPageSearch":true}},"assistantConfig":{"enableStarterQuestions":true,"enableContextualStarterQuestions":true,"deflection":{"enabled":true,"type":"email","email":"support@tella.com","showHelpButton":true}},"basePath":"/docs","hasChatPermissions":false,"hasWebMcpPermissions":true,"toggles":[{"name":"kill-isr","enabled":true,"variant":{"name":"disabled","enabled":false,"feature_enabled":true},"impressionData":false},{"name":"custom-rbac-roles","enabled":true,"variant":{"name":"disabled","enabled":false,"feature_enabled":true},"impressionData":false},{"name":"agent-mintlify-slack","enabled":true,"variant":{"name":"disabled","enabled":false,"feature_enabled":true},"impressionData":false},{"name":"agent-integrations-settings","enabled":true,"variant":{"name":"disabled","enabled":false,"feature_enabled":true},"impressionData":false},{"name":"rbac-expansion","enabled":true,"variant":{"name":"disabled","enabled":false,"feature_enabled":true},"impressionData":false},{"name":"automations-pr-grouping","enabled":true,"variant":{"name":"disabled","enabled":false,"feature_enabled":true},"impressionData":false},{"name":"custom-prefix","enabled":true,"variant":{"name":"disabled","enabled":false,"feature_enabled":true},"impressionData":false},{"name":"analytics-v7","enabled":true,"variant":{"name":"disabled","enabled":false,"feature_enabled":true},"impressionData":false},{"name":"user-flows-analytics","enabled":true,"variant":{"name":"disabled","enabled":false,"feature_enabled":true},"impressionData":false},{"name":"no-publish-flow","enabled":true,"variant":{"name":"disabled","enabled":false,"feature_enabled":true},"impressionData":false},{"name":"workos-onboarding","enabled":true,"variant":{"name":"disabled","enabled":false,"feature_enabled":true},"impressionData":false},{"name":"snapshot-serving-live","enabled":true,"variant":{"name":"disabled","enabled":false,"feature_enabled":true},"impressionData":false},{"name":"stripTemperatureMiddleware","enabled":true,"variant":{"name":"disabled","enabled":false,"feature_enabled":true},"impressionData":false},{"name":"support-platform-pylon-zendesk","enabled":true,"variant":{"name":"disabled","enabled":false,"feature_enabled":true},"impressionData":false},{"name":"snapshot-serving","enabled":true,"variant":{"name":"disabled","enabled":false,"feature_enabled":true},"impressionData":false},{"name":"instant-rollback","enabled":true,"variant":{"name":"disabled","enabled":false,"feature_enabled":true},"impressionData":false},{"name":"granular-notifications-server","enabled":true,"variant":{"name":"disabled","enabled":false,"feature_enabled":true},"impressionData":false},{"name":"granular-notifications","enabled":true,"variant":{"name":"disabled","enabled":false,"feature_enabled":true},"impressionData":false},{"name":"automations-fable","enabled":true,"variant":{"name":"disabled","enabled":false,"feature_enabled":true},"impressionData":false},{"name":"fixed-ai-action-pricing","enabled":true,"variant":{"name":"disabled","enabled":false,"feature_enabled":true},"impressionData":false},{"name":"site-roles","enabled":true,"variant":{"name":"disabled","enabled":false,"feature_enabled":true},"impressionData":false},{"name":"automation-resolve-merge-conflict","enabled":true,"variant":{"name":"disabled","enabled":false,"feature_enabled":true},"impressionData":false},{"name":"scoped-publishing","enabled":true,"variant":{"name":"disabled","enabled":false,"feature_enabled":true},"impressionData":false},{"name":"mintql","enabled":true,"variant":{"name":"disabled","enabled":false,"feature_enabled":true},"impressionData":false},{"name":"page-level-analytics","enabled":true,"variant":{"name":"disabled","enabled":false,"feature_enabled":true},"impressionData":false},{"name":"editor-version-history-v2","enabled":true,"variant":{"name":"disabled","enabled":false,"feature_enabled":true},"impressionData":false},{"name":"billing-page-v2","enabled":true,"variant":{"name":"disabled","enabled":false,"feature_enabled":true},"impressionData":false},{"name":"full-page-search","enabled":true,"variant":{"name":"disabled","enabled":false,"feature_enabled":true},"impressionData":false},{"name":"workspace-projects","enabled":true,"variant":{"name":"disabled","enabled":false,"feature_enabled":true},"impressionData":false},{"name":"assistant-v5","enabled":true,"variant":{"name":"disabled","enabled":false,"feature_enabled":true},"impressionData":false},{"name":"fork-pr-previews","enabled":true,"variant":{"name":"disabled","enabled":false,"feature_enabled":true},"impressionData":false},{"name":"revalidation-jwt","enabled":true,"variant":{"name":"disabled","enabled":false,"feature_enabled":true},"impressionData":false},{"name":"workos-sso-scim","enabled":true,"variant":{"name":"disabled","enabled":false,"feature_enabled":true},"impressionData":false},{"name":"hobby-abuse-scan","enabled":true,"variant":{"name":"disabled","enabled":false,"feature_enabled":true},"impressionData":false},{"name":"dashboard-inbox","enabled":true,"variant":{"name":"disabled","enabled":false,"feature_enabled":true},"impressionData":false},{"name":"workos-signup","enabled":true,"variant":{"name":"disabled","enabled":false,"feature_enabled":true},"impressionData":false},{"name":"turbopuffer-dual-write","enabled":true,"variant":{"name":"disabled","enabled":false,"feature_enabled":true},"impressionData":false},{"name":"workos-enabled","enabled":true,"variant":{"name":"disabled","enabled":false,"feature_enabled":true},"impressionData":false},{"name":"approve-review-flow","enabled":true,"variant":{"name":"disabled","enabled":false,"feature_enabled":true},"impressionData":false},{"name":"editor-metadata","enabled":true,"variant":{"name":"disabled","enabled":false,"feature_enabled":true},"impressionData":false},{"name":"sso-setup-deadline-banner","enabled":true,"variant":{"name":"disabled","enabled":false,"feature_enabled":true},"impressionData":false},{"name":"turbopuffer-serve","enabled":true,"variant":{"name":"disabled","enabled":false,"feature_enabled":true},"impressionData":false},{"name":"live-agents","enabled":true,"variant":{"name":"disabled","enabled":false,"feature_enabled":true},"impressionData":false},{"name":"starter-pricing","enabled":true,"variant":{"name":"treatment","enabled":true,"payload":{"type":"string","value":"treatment"},"feature_enabled":true},"impressionData":false},{"name":"llms-txt-v2","enabled":true,"variant":{"name":"disabled","enabled":false,"feature_enabled":true},"impressionData":false},{"name":"wildcard-email-auth","enabled":true,"variant":{"name":"disabled","enabled":false,"feature_enabled":true},"impressionData":false}],"privacy":{"consentBanner":{"enabled":false}},"googleFontsInlined":false},"customCss":[]}
{"page":{"pagePath":"help/editing/use-auto-layouts","slug":"/help/editing/use-auto-layouts","pageMetadata":{"title":"Generate auto layouts","description":"Auto Layouts, in the editor's Layout panel, has the Tella Agent add a sequence of layouts to a clip in an editing style picked for your content. It uses Credits.","canonical":"https://www.tella.com/help/editing/use-auto-layouts","href":"/help/editing/use-auto-layouts"},"description":{"compiledSource":"\"use strict\";\nconst {jsx: _jsx} = arguments[0];\nconst {useMDXComponents: _provideComponents} = arguments[0];\nfunction _createMdxContent(props) {\n const _components = {\n p: \"p\",\n ..._provideComponents(),\n ...props.components\n };\n return _jsx(_components.p, {\n children: \"Auto Layouts, in the editor’s Layout panel, has the Tella Agent add a sequence of layouts to a clip in an editing style picked for your content. It uses Credits.\"\n });\n}\nfunction MDXContent(props = {}) {\n const {wrapper: MDXLayout} = {\n ..._provideComponents(),\n ...props.components\n };\n return MDXLayout ? _jsx(MDXLayout, {\n ...props,\n children: _jsx(_createMdxContent, {\n ...props\n })\n }) : _createMdxContent(props);\n}\nreturn {\n default: MDXContent\n};\n","frontmatter":{},"scope":{}},"pageType":"default","mdx":{"mdxSource":{"compiledSource":"\"use strict\";const{Fragment:_Fragment,jsx:_jsx,jsxs:_jsxs}=arguments[0];const{useMDXComponents:_provideComponents}=arguments[0];function _createMdxContent(props){const _components={a:`a`,code:`code`,li:`li`,ol:`ol`,p:`p`,strong:`strong`,ul:`ul`,..._provideComponents(),...props.components},{Heading,OptimizedFrame,OptimizedImage}=_components;if(!Heading)_missingMdxReference(`Heading`,true);if(!OptimizedFrame)_missingMdxReference(`OptimizedFrame`,true);if(!OptimizedImage)_missingMdxReference(`OptimizedImage`,true);return _jsxs(_Fragment,{children:[_jsxs(_components.p,{children:[`Auto Layouts, in the editor’s `,_jsx(_components.strong,{children:`Layout`}),` panel, analyzes a clip’s transcript and video and adds a sequence of layouts (camera bubbles, screen-only beats, camera cutaways, side-by-side splits, and TV-presenter compositions) in an editing style that fits your content. It works on one clip at a time. The `,_jsx(_components.a,{href:`/help/editing/edit-with-the-tella-agent`,children:`Tella Agent`}),` does the work, so each generation uses `,_jsx(_components.a,{href:`/help/billing/ai-credits`,children:`Credits`}),`.`]}),`\n`,_jsx(OptimizedFrame,{src:`https://www.tella.com/video/vid_cmvqmsscr004202pc5l3699bu/embed?b=0\u0026title=0\u0026a=1\u0026loop=0\u0026t=0\u0026muted=0\u0026wt=0`,width:`100%`,style:{aspectRatio:`160/97`,border:`none`,borderRadius:`8px`},allow:`autoplay; fullscreen`,allowFullScreen:true}),`\n`,_jsx(Heading,{level:`2`,id:`how-to-generate-auto-layouts`,children:`How to generate auto layouts`}),`\n`,_jsxs(_components.ol,{children:[`\n`,_jsxs(_components.li,{children:[`\n`,_jsxs(_components.p,{children:[`Open your video in the editor, click the clip you want on the timeline (or move the playhead into it), and click `,_jsx(_components.strong,{children:`Layout`}),` in the left toolbar.`]}),`\n`,_jsx(OptimizedImage,{src:`https://mintcdn.com/tella/Isiu-Cd8qYEzKYhq/help/images/editing/1-2.png?fit=max\u0026auto=format\u0026n=Isiu-Cd8qYEzKYhq\u0026q=85\u0026s=49b701e369dd757fe960a501f5636d92`,alt:`1 2.png`,\"data-og-width\":`1600`,width:`1600`,\"data-og-height\":`813`,height:`813`,\"data-path\":`help/images/editing/1-2.png`,\"data-optimize\":`true`,\"data-opv\":`3`,srcset:`https://mintcdn.com/tella/Isiu-Cd8qYEzKYhq/help/images/editing/1-2.png?w=280\u0026fit=max\u0026auto=format\u0026n=Isiu-Cd8qYEzKYhq\u0026q=85\u0026s=9c98b72cb7619a891dd869a6e2afa7cd 280w, https://mintcdn.com/tella/Isiu-Cd8qYEzKYhq/help/images/editing/1-2.png?w=560\u0026fit=max\u0026auto=format\u0026n=Isiu-Cd8qYEzKYhq\u0026q=85\u0026s=8d119e44900078d791ca89dd0439d13e 560w, https://mintcdn.com/tella/Isiu-Cd8qYEzKYhq/help/images/editing/1-2.png?w=840\u0026fit=max\u0026auto=format\u0026n=Isiu-Cd8qYEzKYhq\u0026q=85\u0026s=6055d4690e814ed604dd9fdf59d692ec 840w, https://mintcdn.com/tella/Isiu-Cd8qYEzKYhq/help/images/editing/1-2.png?w=1100\u0026fit=max\u0026auto=format\u0026n=Isiu-Cd8qYEzKYhq\u0026q=85\u0026s=8f0eb840e3af04e64ddee1c853f23d5b 1100w, https://mintcdn.com/tella/Isiu-Cd8qYEzKYhq/help/images/editing/1-2.png?w=1650\u0026fit=max\u0026auto=format\u0026n=Isiu-Cd8qYEzKYhq\u0026q=85\u0026s=bdde4b6e4b04ff3fa34a1367372e98e0 1650w, https://mintcdn.com/tella/Isiu-Cd8qYEzKYhq/help/images/editing/1-2.png?w=2500\u0026fit=max\u0026auto=format\u0026n=Isiu-Cd8qYEzKYhq\u0026q=85\u0026s=8945e579c5b304f7c592daf48ba0e544 2500w`}),`\n`]}),`\n`,_jsxs(_components.li,{children:[`\n`,_jsxs(_components.p,{children:[`At the bottom of the panel, next to `,_jsx(_components.strong,{children:`Auto Layouts`}),`, click `,_jsx(_components.strong,{children:`Generate`}),`. There’s no style to choose; Tella picks one from your clip’s content.`]}),`\n`,_jsx(OptimizedImage,{src:`https://mintcdn.com/tella/Isiu-Cd8qYEzKYhq/help/images/editing/3-1.png?fit=max\u0026auto=format\u0026n=Isiu-Cd8qYEzKYhq\u0026q=85\u0026s=552879f1ac7ee946d5236f9f2dec423a`,alt:`3 1.png`,\"data-og-width\":`1600`,width:`1600`,\"data-og-height\":`815`,height:`815`,\"data-path\":`help/images/editing/3-1.png`,\"data-optimize\":`true`,\"data-opv\":`3`,srcset:`https://mintcdn.com/tella/Isiu-Cd8qYEzKYhq/help/images/editing/3-1.png?w=280\u0026fit=max\u0026auto=format\u0026n=Isiu-Cd8qYEzKYhq\u0026q=85\u0026s=bd3aef55fdbeb86f3b7d18a8f23ad137 280w, https://mintcdn.com/tella/Isiu-Cd8qYEzKYhq/help/images/editing/3-1.png?w=560\u0026fit=max\u0026auto=format\u0026n=Isiu-Cd8qYEzKYhq\u0026q=85\u0026s=9b2d6f3a00e85d6dfbd95f5619e5be4a 560w, https://mintcdn.com/tella/Isiu-Cd8qYEzKYhq/help/images/editing/3-1.png?w=840\u0026fit=max\u0026auto=format\u0026n=Isiu-Cd8qYEzKYhq\u0026q=85\u0026s=426bb7b087c756db16fab6621ed28761 840w, https://mintcdn.com/tella/Isiu-Cd8qYEzKYhq/help/images/editing/3-1.png?w=1100\u0026fit=max\u0026auto=format\u0026n=Isiu-Cd8qYEzKYhq\u0026q=85\u0026s=bbdb6cba4235be7f6386b4c0622e32cc 1100w, https://mintcdn.com/tella/Isiu-Cd8qYEzKYhq/help/images/editing/3-1.png?w=1650\u0026fit=max\u0026auto=format\u0026n=Isiu-Cd8qYEzKYhq\u0026q=85\u0026s=b6520cda2316b3de73c9682f44e5ecb3 1650w, https://mintcdn.com/tella/Isiu-Cd8qYEzKYhq/help/images/editing/3-1.png?w=2500\u0026fit=max\u0026auto=format\u0026n=Isiu-Cd8qYEzKYhq\u0026q=85\u0026s=2b52abc5d6a8ac5ab41c43a43629916f 2500w`}),`\n`,_jsx(_components.p,{children:`The Tella Agent chat opens with a request for auto layouts on your clip, and the agent applies the layouts as it works.`}),`\n`,_jsx(OptimizedImage,{src:`https://mintcdn.com/tella/Isiu-Cd8qYEzKYhq/help/images/editing/3-2.png?fit=max\u0026auto=format\u0026n=Isiu-Cd8qYEzKYhq\u0026q=85\u0026s=91a9da1fd4bcfb3d509a748f4825568d`,alt:`3 2.png`,\"data-og-width\":`1600`,width:`1600`,\"data-og-height\":`813`,height:`813`,\"data-path\":`help/images/editing/3-2.png`,\"data-optimize\":`true`,\"data-opv\":`3`,srcset:`https://mintcdn.com/tella/Isiu-Cd8qYEzKYhq/help/images/editing/3-2.png?w=280\u0026fit=max\u0026auto=format\u0026n=Isiu-Cd8qYEzKYhq\u0026q=85\u0026s=6347ed54b0ec6ba049612e984cba7dd8 280w, https://mintcdn.com/tella/Isiu-Cd8qYEzKYhq/help/images/editing/3-2.png?w=560\u0026fit=max\u0026auto=format\u0026n=Isiu-Cd8qYEzKYhq\u0026q=85\u0026s=bcfe3f746408b261b8c80ed7025a508b 560w, https://mintcdn.com/tella/Isiu-Cd8qYEzKYhq/help/images/editing/3-2.png?w=840\u0026fit=max\u0026auto=format\u0026n=Isiu-Cd8qYEzKYhq\u0026q=85\u0026s=9ff23cd89f094af5dd24dc3dce213722 840w, https://mintcdn.com/tella/Isiu-Cd8qYEzKYhq/help/images/editing/3-2.png?w=1100\u0026fit=max\u0026auto=format\u0026n=Isiu-Cd8qYEzKYhq\u0026q=85\u0026s=1739de18f556163ddce55dd216d07a9b 1100w, https://mintcdn.com/tella/Isiu-Cd8qYEzKYhq/help/images/editing/3-2.png?w=1650\u0026fit=max\u0026auto=format\u0026n=Isiu-Cd8qYEzKYhq\u0026q=85\u0026s=ec06513c02229043ed7796c0ccf0c90b 1650w, https://mintcdn.com/tella/Isiu-Cd8qYEzKYhq/help/images/editing/3-2.png?w=2500\u0026fit=max\u0026auto=format\u0026n=Isiu-Cd8qYEzKYhq\u0026q=85\u0026s=a1a77659072dcfcc40242b98c541ee77 2500w`}),`\n`]}),`\n`,_jsxs(_components.li,{children:[`\n`,_jsx(_components.p,{children:`Wait for the generation to complete.`}),`\n`]}),`\n`,_jsxs(_components.li,{children:[`\n`,_jsx(_components.p,{children:`Review the result. The new layouts show on the clip in the timeline, and the agent’s reply in the chat lists what it changed.`}),`\n`]}),`\n`]}),`\n`,_jsx(Heading,{level:`2`,id:`what-can-i-do-after-generating`,children:`What can I do after generating?`}),`\n`,_jsx(_components.p,{children:`After auto layouts finishes, you can:`}),`\n`,_jsxs(_components.ul,{children:[`\n`,_jsxs(_components.li,{children:[`Click `,_jsx(_components.strong,{children:`Generate`}),` again for an alternative take, or tell the agent in the chat what didn’t work well and it adjusts the layouts`]}),`\n`,_jsx(_components.li,{children:`Delete individual layouts while keeping the rest`}),`\n`,_jsx(_components.li,{children:`Adjust the start and end of any layout`}),`\n`,_jsxs(_components.li,{children:[`Undo or redo`,`\n`,_jsxs(_components.ul,{children:[`\n`,_jsxs(_components.li,{children:[`Windows: `,_jsx(_components.code,{children:`Ctrl + Z`}),` to undo, `,_jsx(_components.code,{children:`Ctrl + Shift + Z`}),` or `,_jsx(_components.code,{children:`Ctrl + Y`}),` to redo`]}),`\n`,_jsxs(_components.li,{children:[`macOS: `,_jsx(_components.code,{children:`Cmd + Z`}),` to undo, `,_jsx(_components.code,{children:`Cmd + Shift + Z`}),` or `,_jsx(_components.code,{children:`Cmd + Y`}),` to redo`]}),`\n`]}),`\n`]}),`\n`]}),`\n`,_jsx(Heading,{level:`2`,id:`does-auto-layouts-use-credits`,children:`Does auto layouts use credits?`}),`\n`,_jsxs(_components.p,{children:[`Yes. Auto layouts runs through the `,_jsx(_components.a,{href:`/help/editing/edit-with-the-tella-agent`,children:`Tella Agent`}),`, so every generation and regeneration spends your workspace’s `,_jsx(_components.a,{href:`/help/billing/ai-credits`,children:`Credits`}),`, the same as sending the agent a message.`]}),`\n`,_jsxs(_components.p,{children:[`Hover over the round credits icon next to the `,_jsx(_components.strong,{children:`Auto Layouts`}),` title to see your workspace’s balance, for example `,_jsx(_components.strong,{children:`Requires credits: 2,300 available`}),`.`]}),`\n`,_jsx(_components.p,{children:`If your workspace is out of credits, the agent can’t run auto layouts until a workspace owner adds more or your monthly allowance resets. You can still add and edit layouts by hand.`}),`\n`,_jsx(Heading,{level:`2`,id:`which-editing-styles-are-available`,children:`Which editing styles are available?`}),`\n`,_jsx(_components.p,{children:`Tella picks one of these styles based on what you say and show. The styles available depend on your clip’s recording type and canvas size.`}),`\n`,_jsxs(_components.ul,{children:[`\n`,_jsxs(_components.li,{children:[_jsx(_components.strong,{children:`Demo:`}),` high-energy proof + commentary; mixes screen reveals, camera cutaways, and punch-ins for product walkthroughs, page critiques, and feature launches`]}),`\n`,_jsxs(_components.li,{children:[_jsx(_components.strong,{children:`Tutorial:`}),` procedural, step-by-step instruction where the viewer needs to follow exact clicks, typing, and configuration`]}),`\n`,_jsxs(_components.li,{children:[_jsx(_components.strong,{children:`Presentation:`}),` speaker-led talks, pitches, recaps, and lessons; includes a hosted `,_jsx(_components.strong,{children:`TV show`}),` variant on landscape canvases that frames the speaker like a presenter`]}),`\n`,_jsxs(_components.li,{children:[_jsx(_components.strong,{children:`Intro \u0026 Outro:`}),` only bookends the clip with a camera-led intro and outro and leaves the middle untouched`]}),`\n`]}),`\n`,_jsx(Heading,{level:`2`,id:`image-b-roll`,children:`Image B-roll`}),`\n`,_jsxs(_components.p,{children:[`Auto layouts doesn’t add AI-generated image B-roll. To cut away to an image or video, `,_jsx(_components.a,{href:`/help/editing/use-media`,children:`add media (B-roll)`}),` to any layout after generating.`]}),`\n`,_jsx(Heading,{level:`2`,id:`which-recordings-and-canvas-sizes-are-supported`,children:`Which recordings and canvas sizes are supported?`}),`\n`,_jsx(_components.p,{children:`Auto layouts works with:`}),`\n`,_jsxs(_components.ul,{children:[`\n`,_jsxs(_components.li,{children:[_jsx(_components.strong,{children:`Landscape (16:9):`}),` two-track (camera + screen), screen-only, and camera-only recordings`]}),`\n`,_jsxs(_components.li,{children:[_jsx(_components.strong,{children:`Portrait (9:16):`}),` two-track, screen-only, and camera-only recordings`]}),`\n`,_jsxs(_components.li,{children:[_jsx(_components.strong,{children:`Square (1:1) and round:`}),` two-track and camera-only recordings`]}),`\n`]}),`\n`,_jsx(_components.p,{children:`Compositions adapt to the canvas: portrait clips use a presenter-forward split, and landscape presentations can use the TV-presenter framing.`}),`\n`,_jsx(Heading,{level:`2`,id:`best-practices`,children:`Best practices`}),`\n`,_jsxs(_components.ul,{children:[`\n`,_jsxs(_components.li,{children:[_jsx(_components.strong,{children:`Start with a clean slate:`}),` auto layouts works best on raw, unedited recordings`]}),`\n`,_jsxs(_components.li,{children:[_jsx(_components.strong,{children:`One clip at a time:`}),` generate layouts per clip; layouts won’t generate across an entire video in one pass`]}),`\n`]}),`\n`,_jsx(Heading,{level:`2`,id:`what-to-expect`,children:`What to expect`}),`\n`,_jsxs(_components.ul,{children:[`\n`,_jsxs(_components.li,{children:[_jsx(_components.strong,{children:`Variability:`}),` each generation can produce slightly different results`]}),`\n`,_jsxs(_components.li,{children:[_jsx(_components.strong,{children:`Pacing:`}),` overrides are used as exceptions to the base layout, so most of the clip stays on the base composition with timed accents around important moments`]}),`\n`,_jsxs(_components.li,{children:[_jsx(_components.strong,{children:`Processing time:`}),` longer clips take longer to generate`]}),`\n`]}),`\n`,_jsx(Heading,{level:`2`,id:`what-are-the-limits-of-auto-layouts`,children:`What are the limits of auto layouts?`}),`\n`,_jsxs(_components.ul,{children:[`\n`,_jsx(_components.li,{children:`Make all crop changes before running auto layouts. Cropping afterwards affects every layout and can produce unexpected results`}),`\n`,_jsx(_components.li,{children:`After cropping, you can’t update the generated layouts`}),`\n`]})]})}function MDXContent(props={}){const{wrapper:MDXLayout}={..._provideComponents(),...props.components};return MDXLayout?_jsx(MDXLayout,{...props,children:_jsx(_createMdxContent,{...props})}):_createMdxContent(props)}return{default:MDXContent};function _missingMdxReference(id,component){throw new Error(`Expected `+(component?`component`:`object`)+\" `\"+id+\"` to be defined: you likely forgot to import, pass, or provide it.\")}","frontmatter":{},"scope":{"codeStyling":"system","config":{},"pageMetadata":{"title":"Generate auto layouts","description":"Auto Layouts, in the editor's Layout panel, has the Tella Agent add a sequence of layouts to a clip in an editing style picked for your content. It uses Credits.","canonical":"https://www.tella.com/help/editing/use-auto-layouts","href":"/help/editing/use-auto-layouts"}}},"mdxSourceWithNoJs":null},"mdxExtracts":{"tableOfContents":[{"title":"How to generate auto layouts","slug":"how-to-generate-auto-layouts","depth":2,"children":[]},{"title":"What can I do after generating?","slug":"what-can-i-do-after-generating","depth":2,"children":[]},{"title":"Does auto layouts use credits?","slug":"does-auto-layouts-use-credits","depth":2,"children":[]},{"title":"Which editing styles are available?","slug":"which-editing-styles-are-available","depth":2,"children":[]},{"title":"Image B-roll","slug":"image-b-roll","depth":2,"children":[]},{"title":"Which recordings and canvas sizes are supported?","slug":"which-recordings-and-canvas-sizes-are-supported","depth":2,"children":[]},{"title":"Best practices","slug":"best-practices","depth":2,"children":[]},{"title":"What to expect","slug":"what-to-expect","depth":2,"children":[]},{"title":"What are the limits of auto layouts?","slug":"what-are-the-limits-of-auto-layouts","depth":2,"children":[]}],"codeExamples":{}},"jsLinks":["/docs/_mintlify/custom/tella/0df50391d431fa00/support-chat.js","/docs/_mintlify/custom/tella/7e6fe091e3982139/lettervisit.js"],"subdomain":"tella","siteName":"Tella","title":"Generate auto layouts - Tella","relatedPagesConfig":{"enabled":true,"limit":5,"mode":"automatic"},"contextualStarterQuestions":[{"_id":"6aff754a01404166771d3c5e","deploymentId":"68c9b8eae1828f3bd1ee878f","questionText":"What layouts can be added?","status":"active","generatedBy":"contextual","path":"help/editing/use-auto-layouts","createdAt":"2026-11-19T22:16:42.904Z","updatedAt":"2026-11-19T22:16:42.904Z","__v":0},{"_id":"6aff754a01404166771d3c5f","deploymentId":"68c9b8eae1828f3bd1ee878f","questionText":"Do auto layouts use Credits?","status":"active","generatedBy":"contextual","path":"help/editing/use-auto-layouts","createdAt":"2026-11-19T22:16:42.904Z","updatedAt":"2026-11-19T22:16:42.904Z","__v":0},{"_id":"6aff754a01404166771d3c5d","deploymentId":"68c9b8eae1828f3bd1ee878f","questionText":"How do I generate auto layouts?","status":"active","generatedBy":"contextual","path":"help/editing/use-auto-layouts","createdAt":"2026-11-19T22:16:42.904Z","updatedAt":"2026-11-19T22:16:42.904Z","__v":0}],"navMaps":{"firstHrefInVersion":{},"firstHrefInLanguage":{},"searchTabScopes":[{"tab":"Help Center"},{"tab":"Developers"},{"tab":"Changelog"}]},"lastModified":"2026-11-19T22:16:29.300Z","gitLastModified":"2026-11-19T22:15:49.000Z","originalFileLocation":"help/editing/use-auto-layouts.mdx"},"headHtml":"\u003cscript data-mint-head>(function(){var d=document.documentElement,p=null;if(!p){try{p=localStorage.getItem(\"isDarkMode\")}catch(e){}if(p==='true')p='dark';else if(p==='false')p='light';if(p!=='light'\u0026\u0026p!=='dark'\u0026\u0026p!=='system')p=\"system\"}var r=p==='system'?(matchMedia(\"(prefers-color-scheme: dark)\").matches?'dark':'light'):p;d.classList.remove(r==='dark'?'light':'dark');d.classList.add(r);d.setAttribute(\"data-theme-preference\",p)})();\u003c/script>\u003cmeta data-mint-head name=\"description\" content=\"Auto Layouts, in the editor\u0026#x27;s Layout panel, has the Tella Agent add a sequence of layouts to a clip in an editing style picked for your content. It uses Credits.\">\u003cmeta data-mint-head name=\"application-name\" content=\"Tella\">\u003cmeta data-mint-head name=\"generator\" content=\"Mintlify\">\u003clink data-mint-head rel=\"icon\" type=\"image/png\" sizes=\"192x192\" href=\"/docs/mintlify-assets/_mintlify/favicons/tella/dDRDWwVgURpbIwO7/_generated/favicon/android-chrome-192x192.png\" media=\"(prefers-color-scheme: light)\">\u003clink data-mint-head rel=\"apple-touch-icon\" type=\"image/png\" sizes=\"180x180\" href=\"/docs/mintlify-assets/_mintlify/favicons/tella/dDRDWwVgURpbIwO7/_generated/favicon/apple-touch-icon.png\">\u003clink data-mint-head rel=\"icon\" type=\"image/png\" sizes=\"16x16\" href=\"/docs/mintlify-assets/_mintlify/favicons/tella/dDRDWwVgURpbIwO7/_generated/favicon/favicon-16x16.png\" media=\"(prefers-color-scheme: light)\">\u003clink data-mint-head rel=\"icon\" type=\"image/png\" sizes=\"32x32\" href=\"/docs/mintlify-assets/_mintlify/favicons/tella/dDRDWwVgURpbIwO7/_generated/favicon/favicon-32x32.png\" media=\"(prefers-color-scheme: light)\">\u003clink data-mint-head rel=\"shortcut icon\" type=\"image/x-icon\" href=\"/docs/mintlify-assets/_mintlify/favicons/tella/dDRDWwVgURpbIwO7/_generated/favicon/favicon.ico\" media=\"(prefers-color-scheme: light)\">\u003clink data-mint-head rel=\"icon\" type=\"image/png\" sizes=\"192x192\" href=\"/docs/mintlify-assets/_mintlify/favicons/tella/dDRDWwVgURpbIwO7/_generated/favicon-dark/android-chrome-192x192.png\" media=\"(prefers-color-scheme: dark)\">\u003clink data-mint-head rel=\"icon\" type=\"image/png\" sizes=\"16x16\" href=\"/docs/mintlify-assets/_mintlify/favicons/tella/dDRDWwVgURpbIwO7/_generated/favicon-dark/favicon-16x16.png\" media=\"(prefers-color-scheme: dark)\">\u003clink data-mint-head rel=\"icon\" type=\"image/png\" sizes=\"32x32\" href=\"/docs/mintlify-assets/_mintlify/favicons/tella/dDRDWwVgURpbIwO7/_generated/favicon-dark/favicon-32x32.png\" media=\"(prefers-color-scheme: dark)\">\u003clink data-mint-head rel=\"shortcut icon\" type=\"image/x-icon\" href=\"/docs/mintlify-assets/_mintlify/favicons/tella/dDRDWwVgURpbIwO7/_generated/favicon-dark/favicon.ico\" media=\"(prefers-color-scheme: dark)\">\u003cmeta data-mint-head property=\"og:title\" content=\"Generate auto layouts - Tella\">\u003cmeta data-mint-head property=\"og:description\" content=\"Auto Layouts, in the editor\u0026#x27;s Layout panel, has the Tella Agent add a sequence of layouts to a clip in an editing style picked for your content. It uses Credits.\">\u003cmeta data-mint-head property=\"og:site_name\" content=\"Tella\">\u003cmeta data-mint-head property=\"og:url\" content=\"https://www.tella.com/help/editing/use-auto-layouts\">\u003cmeta data-mint-head property=\"og:type\" content=\"website\">\u003cmeta data-mint-head property=\"og:image\" content=\"https://tella.mintlify.site/docs/_mintlify/api/og/v2?division=Layout\u0026amp;title=Generate+auto+layouts\u0026amp;description=Auto+Layouts%2C+in+the+editor%27s+Layout+panel%2C+has+the+Tella+Agent+add+a+sequence+of+layouts+to+a+clip+in+an+editing+style+picked+for+your+content.+It+uses+Credits\u0026amp;theme=83fc5c73f5b3900df40eca67\u0026amp;signature=03bb9d5dafbefec9e0ca6a274b619af4b542ec603fa5e3eb13de93ee8a0b78da\">\u003cmeta data-mint-head property=\"og:image:width\" content=\"1200\">\u003cmeta data-mint-head property=\"og:image:height\" content=\"630\">\u003cmeta data-mint-head name=\"twitter:card\" content=\"summary_large_image\">\u003cmeta data-mint-head name=\"twitter:title\" content=\"Generate auto layouts - Tella\">\u003cmeta data-mint-head name=\"twitter:description\" content=\"Auto Layouts, in the editor\u0026#x27;s Layout panel, has the Tella Agent add a sequence of layouts to a clip in an editing style picked for your content. It uses Credits.\">\u003cmeta data-mint-head name=\"twitter:image\" content=\"https://tella.mintlify.site/docs/_mintlify/api/og/v2?division=Layout\u0026amp;title=Generate+auto+layouts\u0026amp;description=Auto+Layouts%2C+in+the+editor%27s+Layout+panel%2C+has+the+Tella+Agent+add+a+sequence+of+layouts+to+a+clip+in+an+editing+style+picked+for+your+content.+It+uses+Credits\u0026amp;theme=83fc5c73f5b3900df40eca67\u0026amp;signature=03bb9d5dafbefec9e0ca6a274b619af4b542ec603fa5e3eb13de93ee8a0b78da\">\u003cmeta data-mint-head name=\"twitter:image:width\" content=\"1200\">\u003cmeta data-mint-head name=\"twitter:image:height\" content=\"630\">\u003cmeta data-mint-head name=\"msapplication-config\" content=\"/docs/mintlify-assets/_mintlify/favicons/tella/dDRDWwVgURpbIwO7/_generated/favicon/browserconfig.xml\">\u003cmeta data-mint-head name=\"apple-mobile-web-app-title\" content=\"Tella\">\u003cmeta data-mint-head name=\"msapplication-TileColor\" content=\"#8278FA\">\u003clink data-mint-head rel=\"canonical\" href=\"https://www.tella.com/help/editing/use-auto-layouts\">\u003clink data-mint-head rel=\"alternate\" type=\"application/xml\" href=\"/docs/sitemap.xml\">\u003clink data-mint-head rel=\"alternate\" type=\"text/markdown\" href=\"/docs/help/editing/use-auto-layouts.md\">\u003cscript data-mint-head type=\"application/ld+json\">{\"@context\":\"https://schema.org\",\"@graph\":[{\"@type\":\"Organization\",\"@id\":\"https://www.tella.com/#organization\",\"name\":\"Tella\",\"url\":\"https://www.tella.com\",\"logo\":{\"@type\":\"ImageObject\",\"url\":\"https://mintcdn.com/tella/znRZoQ3e3rlGBTT2/logo-light.svg?fit=max\u0026auto=format\u0026n=znRZoQ3e3rlGBTT2\u0026q=85\u0026s=dd044b03efe593b53353a039bfb31fbf\"}},{\"@type\":\"WebSite\",\"@id\":\"https://www.tella.com/docs#website\",\"name\":\"Tella\",\"url\":\"https://www.tella.com/docs\",\"publisher\":{\"@id\":\"https://www.tella.com/#organization\"}},{\"@type\":\"WebPage\",\"@id\":\"https://www.tella.com/help/editing/use-auto-layouts#webpage\",\"url\":\"https://www.tella.com/help/editing/use-auto-layouts\",\"name\":\"Generate auto layouts\",\"description\":\"Auto Layouts, in the editor's Layout panel, has the Tella Agent add a sequence of layouts to a clip in an editing style picked for your content. It uses Credits.\",\"dateModified\":\"2026-11-19T22:15:49.000Z\",\"isPartOf\":{\"@id\":\"https://www.tella.com/docs#website\"},\"breadcrumb\":{\"@id\":\"https://www.tella.com/help/editing/use-auto-layouts#breadcrumb\"}},{\"@type\":\"BreadcrumbList\",\"@id\":\"https://www.tella.com/help/editing/use-auto-layouts#breadcrumb\",\"itemListElement\":[{\"@type\":\"ListItem\",\"position\":1,\"name\":\"Edit\",\"item\":\"https://www.tella.com/docs/help/editing/edit-a-video\"},{\"@type\":\"ListItem\",\"position\":2,\"name\":\"Layout\",\"item\":\"https://www.tella.com/docs/help/editing/use-layouts\"},{\"@type\":\"ListItem\",\"position\":3,\"name\":\"Generate auto layouts\",\"item\":\"https://www.tella.com/help/editing/use-auto-layouts\"}]},{\"@type\":[\"Article\",\"TechArticle\"],\"@id\":\"https://www.tella.com/help/editing/use-auto-layouts#article\",\"headline\":\"Generate auto layouts\",\"name\":\"Generate auto layouts\",\"description\":\"Auto Layouts, in the editor's Layout panel, has the Tella Agent add a sequence of layouts to a clip in an editing style picked for your content. It uses Credits.\",\"url\":\"https://www.tella.com/help/editing/use-auto-layouts\",\"mainEntityOfPage\":{\"@id\":\"https://www.tella.com/help/editing/use-auto-layouts#webpage\"},\"dateModified\":\"2026-11-19T22:15:49.000Z\",\"publisher\":{\"@id\":\"https://www.tella.com/#organization\"},\"isPartOf\":{\"@id\":\"https://www.tella.com/docs#website\"}}]}\u003c/script>\u003cscript data-mint-head type=\"application/ld+json\">{\"@context\":\"https://schema.org\",\"@type\":\"WebSite\",\"name\":\"Tella\",\"publisher\":{\"@type\":\"Organization\",\"name\":\"Tella\"},\"provider\":{\"@type\":\"Organization\",\"name\":\"Mintlify\",\"url\":\"https://mintlify.com\"}}\u003c/script>","agentPointerHref":"/docs/help/editing/use-auto-layouts.md","siteName":"Tella","nav":{"global":{"anchors":[{"anchor":"Changelog","icon":"clock-rotate-left","href":"/changelog"},{"anchor":"Community","icon":"users","href":"https://community.tella.tv"},{"anchor":"System Status","icon":"signal","href":"https://status.tella.com"},{"anchor":"Contact Support","icon":"envelope","href":"mailto:support@tella.com"},{"anchor":"Debug","icon":"bug","href":"/help/support/debug-camera-and-microphone-issues"}]},"tabs":[{"tab":"Help Center","groups":[{"group":"Getting started","pages":[{"title":"Welcome to Tella","href":"/help/introduction/welcome"},{"title":"Getting started with Tella","href":"/help/introduction/getting-started"},{"title":"Video tutorials","href":"/help/introduction/tutorials"},{"title":"FAQ","href":"/help/introduction/faq"},{"title":"Glossary","href":"/help/introduction/glossary"},{"title":"Keyboard shortcuts","href":"/help/tips/keyboard-shortcuts"},{"title":"Command menu","href":"/help/tips/command-menu"}]},{"group":"Record","pages":[{"group":"Choose how you record","pages":[{"title":"Record a video using the web app","href":"/help/recording/record-a-video-using-the-web-app"},{"title":"Record a video using the Chrome extension","sidebarTitle":"Chrome extension","href":"/help/recording/record-a-video-using-the-chrome-extension"},{"title":"Record a video using the Mac app","href":"/help/recording/record-a-video-using-the-mac-app"},{"title":"What are the Mac app system requirements?","sidebarTitle":"Mac system requirements","href":"/help/mac-app/mac-app-system-requirements"},{"title":"Resize a window for consistent recordings","sidebarTitle":"Resize a window","href":"/help/mac-app/resize-a-window-for-consistent-recordings"},{"title":"Record with the Tella Windows app","sidebarTitle":"Windows app","href":"/help/recording/record-a-video-using-the-windows-app"},{"title":"What are the Windows app system requirements?","sidebarTitle":"Windows system requirements","href":"/help/windows-app/windows-app-system-requirements"},{"title":"Record with AI agents using Auto Capture","sidebarTitle":"Record with AI agents","href":"/help/integrations/auto-capture"},{"title":"Can I use Tella on my phone or iPad?","sidebarTitle":"Phone and iPad","href":"/help/faq/use-tella-on-mobile"},{"title":"What are Tella's minimum requirements?","sidebarTitle":"Minimum requirements","href":"/help/faq/usage-requirements"}]},{"group":"Set up your recording","pages":[{"title":"Choose what to record","href":"/help/recording/choose-what-to-record"},{"title":"Allow camera, mic, and screen access in your browser","sidebarTitle":"Browser permissions","href":"/help/recording/grant-permissions-for-camera-mic-screen-on-the-web-app-and-chrome-extension"},{"title":"Test your webcam and microphone","href":"/help/recording/test-your-webcam-and-microphone"},{"title":"Change your camera background","href":"/help/recording/blur-your-camera-background"},{"title":"Record system audio (desktop sound)","sidebarTitle":"Record system audio","href":"/help/troubleshooting/record-system-audio"},{"title":"Can I record with multiple cameras?","sidebarTitle":"Multiple cameras","href":"/help/faq/multiple-cameras"},{"title":"Use your iPhone as a webcam","href":"/help/tips/use-your-i-phone-as-a-webcam"},{"title":"Insta360 Link Controller Issues","href":"/help/specific-cameras/resolving-issues-with-insta360-link-controller-on-mac"},{"title":"What audio bitrate does Tella record in?","sidebarTitle":"Audio bitrate","href":"/help/faq/what-audio-bitrate-do-you-record-in"}]},{"group":"Recording modes and clips","pages":[{"title":"Record faster with quick mode","href":"/help/recording/record-faster-with-quick-mode"},{"title":"Record and add clips to a video","href":"/help/recording/use-clips"},{"title":"Re-record clips","href":"/help/recording/re-record-clips"},{"title":"Can I combine two separate recordings into one video?","sidebarTitle":"Combine recordings","href":"/help/faq/combine-separate-recordings"}]},{"group":"While you record","pages":[{"title":"Use speaker notes while recording (teleprompter)","sidebarTitle":"Speaker notes","href":"/help/recording/use-speaker-notes-while-recording"},{"title":"See yourself while recording with picture-in-picture","sidebarTitle":"Picture-in-picture","href":"/help/recording/see-yourself-while-recording-with-picture-in-picture"},{"title":"Record a slideshow presentation","href":"/help/recording/record-slideshow-presentation"},{"title":"Record camera only on Mac","href":"/help/recording/record-camera-only-on-mac"},{"title":"Record an iPhone or iPad demo in Tella","sidebarTitle":"Record an iPhone or iPad","href":"/help/tips/i-phone-demos-using-screen-mirroring"}]}]},{"group":"Edit","pages":[{"group":"Editor basics","pages":[{"title":"Edit a video","href":"/help/editing/edit-a-video"},{"title":"Edit faster with low-res mode","href":"/help/editing/low-res-mode"},{"title":"Change canvas size","href":"/help/editing/change-canvas-size"},{"title":"Adjust playback speed in the editor","sidebarTitle":"Editor playback speed","href":"/help/editing/editor-playback-speed"},{"title":"Can I hide or close the editor sidebar?","sidebarTitle":"Hide the editor sidebar","href":"/help/faq/hide-or-close-editor-sidebar"},{"title":"Work with the multi-track timeline","sidebarTitle":"Multi-track timeline","href":"/help/editing/multi-track-timeline"},{"title":"Add library videos as clips","href":"/help/editing/add-library-videos-as-clips"},{"title":"Can I recover a deleted clip?","href":"/help/recording/recover-a-deleted-clip"},{"title":"Create engaging video intros","href":"/help/tips/create-engaging-video-intros"}]},{"group":"Video title menu","pages":[{"title":"Edit video title","href":"/help/video-metadata/edit-video-title"},{"title":"Add chapters","href":"/help/editing/chapters"},{"title":"Copy chapters for YouTube","href":"/help/export-videos/youtube-chapters"}]},{"group":"Tella Agent","pages":[{"title":"Edit with the Tella Agent","href":"/help/editing/edit-with-the-tella-agent"},{"title":"Create a skill for the Tella Agent","href":"/help/editing/create-a-skill"},{"title":"Share a skill, publish it to the web or the community","href":"/help/editing/share-a-skill"},{"title":"Create motion graphics with Tella Motion","href":"/help/editing/tella-motion"}]},{"group":"Cut","pages":[{"title":"Cut and split clips","href":"/help/editing/trim-and-split-clips"},{"title":"Remove silences","href":"/help/editing/remove-silences-automatically"},{"title":"Replace a section of your video","href":"/help/editing/replace-a-section-of-your-video"},{"title":"Remix \u0026 reuse videos and clips","href":"/help/editing/remix-and-reuse-videos-and-clips"}]},{"group":"Layout","pages":[{"title":"Choose a layout","href":"/help/editing/use-layouts"},{"title":"Remove your camera background with Cut out","sidebarTitle":"Cut out background","href":"/help/editing/cut-out-camera-background"},{"title":"Use the Blob camera style","href":"/help/editing/use-blob-camera-style"},{"title":"Use multiple layouts in one clip","href":"/help/editing/use-multi-layouts"},{"title":"Save custom layouts","href":"/help/editing/custom-layouts"},{"title":"Create a pop-out camera effect","href":"/help/editing/create-a-pop-out-camera-effect"},{"title":"Add media (B-roll)","href":"/help/editing/use-media"},{"title":"Capture websites and social posts","sidebarTitle":"Websites and social posts","description":"Paste a public web page or X, Instagram, LinkedIn, or TikTok post link into Add from a link in the Media Library, and Tella captures it as an image or scrolling-page video for a layout or overlay.","href":"/help/editing/capture-websites-and-social-posts"},{"title":"Generate auto layouts","href":"/help/editing/use-auto-layouts"},{"title":"Punch in (zoom in) on your camera","sidebarTitle":"Punch in on your camera","description":"A punch-in makes your camera fill more of the frame for a moment. In Tella it is a Layout option, not a zoom in the Effect tool.","href":"/help/tips/punch-in-zoom-in-on-your-camera"}]},{"group":"Effect","pages":[{"title":"Add zooms and screen effects","href":"/help/editing/add-a-zoom"},{"title":"Speed up or slow down part of your video","sidebarTitle":"Speed sections","href":"/help/editing/speed-up-part-of-your-video"},{"title":"Change layout and zoom animation styles","href":"/help/editing/animation-style"},{"title":"Where did the Zoom tool go?","href":"/help/faq/where-is-the-zoom-tool"},{"title":"Customize the animated cursor","href":"/help/editing/customize-animated-cursor"},{"title":"Show keystrokes on screen","href":"/help/editing/show-keystrokes"},{"title":"Add motion blur to screen recordings","sidebarTitle":"Motion blur","href":"/help/editing/add-motion-blur"},{"title":"Shrink the camera during zooms","href":"/help/editing/shrink-camera-during-zooms"},{"title":"Blur or highlight part of your video","sidebarTitle":"Blur and highlight","href":"/help/editing/blurring-and-highlighting"}]},{"group":"Overlay","pages":[{"title":"Overlays overview","href":"/help/editing/overlays"},{"title":"Add media overlays","href":"/help/editing/media-overlays"},{"title":"Import a video from YouTube, X, Instagram, or TikTok","sidebarTitle":"Import videos from links","href":"/help/editing/import-a-youtube-video"},{"title":"Add vintage videos","href":"/help/editing/vintage-videos"},{"title":"Add stickers and animated stickers","sidebarTitle":"Stickers","href":"/help/editing/animated-stickers"},{"title":"Add text to your video","href":"/help/editing/text-overlays"},{"title":"Add shapes to your video","href":"/help/editing/shape-overlays"},{"title":"Put overlays behind the presenter","sidebarTitle":"Overlays behind you","href":"/help/editing/overlays-behind-the-presenter"}]},{"group":"Style","pages":[{"title":"Change the background","href":"/help/editing/pick-a-background"},{"title":"Use an ambient background","sidebarTitle":"Ambient background","href":"/help/editing/use-an-ambient-background"},{"title":"Blur or replace your camera background after recording","sidebarTitle":"Camera background","href":"/help/editing/change-camera-background-after-recording"},{"title":"Add a border or shadow","href":"/help/editing/use-borders"},{"title":"Adjust your video's colors with filters","sidebarTitle":"Color filters","href":"/help/editing/color-filters"},{"title":"Draw on your iPad in a screen recording","sidebarTitle":"Remove background color","href":"/help/editing/draw-on-your-ipad-in-a-screen-recording"},{"title":"Add your logo to videos","href":"/help/editing/add-your-logo-to-videos"}]},{"group":"Subs","pages":[{"title":"Edit with the transcript","href":"/help/editing/edit-the-transcript-of-a-tella-video"},{"title":"Style subtitles","href":"/help/editing/style-subtitles"},{"title":"Show one word at a time in captions","sidebarTitle":"One word at a time","href":"/help/editing/show-one-word-at-a-time-in-captions"},{"title":"Find \u0026 replace subtitles","href":"/help/editing/find-replace-subtitles"},{"title":"Create your custom transcript dictionary","sidebarTitle":"Custom dictionary","href":"/help/editing/create-your-custom-transcript-dictionary"},{"title":"Retranscribe a video","href":"/help/editing/retranscribe-a-video"},{"title":"Translate subtitles into another language","sidebarTitle":"Translate subtitles","href":"/help/editing/translate-subtitles"}]},{"group":"Audio","pages":[{"title":"Add background music to your video","sidebarTitle":"Background music","href":"/help/editing/add-background-music-to-your-video"},{"title":"Add sound effects","href":"/help/editing/sound-effects"},{"title":"Adjust audio levels","href":"/help/editing/adjust-audio-levels"},{"title":"Studio Voice (audio enhancement)","href":"/help/editing/studio-voice-audio-enhancement"},{"title":"Add audio effects","sidebarTitle":"Audio effects","href":"/help/editing/add-audio-effects"},{"title":"Can I add a voiceover after recording?","sidebarTitle":"Voiceover after recording","href":"/help/faq/add-a-voiceover-after-recording"}]},{"group":"Layout → Adjust","pages":[{"title":"Crop screen recordings","href":"/help/editing/crop-screen-recordings"},{"title":"Crop one layout without changing the rest of the clip","href":"/help/editing/crop-one-layout"},{"title":"Adjust your camera frame","href":"/help/editing/adjust-your-camera-frame"},{"title":"Keep your face centered in the camera frame","href":"/help/editing/keep-face-centered"},{"title":"Mirror (or flip) your camera","href":"/help/editing/mirror-or-flip-your-camera"},{"title":"Turn on eye contact","href":"/help/editing/eye-contact"},{"title":"Preview social safe zones","href":"/help/editing/social-safe-zones"},{"title":"Choose how clips transition","href":"/help/editing/clip-transitions"}]}]},{"group":"Share and embed","pages":[{"group":"Share a video","pages":[{"title":"Share and download your video","href":"/help/sharing/share-and-download-a-video"},{"title":"Collect viewer emails with a gate","sidebarTitle":"Collect viewer emails","href":"/help/sharing/collect-viewer-emails"},{"title":"Add a team member to your video","href":"/help/teams/how-can-i-add-a-team-member-as-an-editor-of-your-video"},{"title":"Video analytics","href":"/help/sharing/analytics"}]},{"group":"Publish","pages":[{"title":"Publish a video to social media","href":"/help/sharing/publish-to-social-media"},{"title":"Publish to YouTube and YouTube Shorts","href":"/help/sharing/publish-to-youtube"},{"title":"Publish to LinkedIn","href":"/help/sharing/publish-to-linkedin"},{"title":"Publish to X","href":"/help/sharing/publish-to-x"},{"title":"Publish to TikTok","href":"/help/sharing/publish-to-tiktok"},{"title":"Publish to Instagram and Facebook","href":"/help/sharing/publish-to-instagram-and-facebook"},{"title":"Video requirements for each social platform","href":"/help/sharing/social-publishing-requirements"},{"title":"Why did my video fail to publish?","href":"/help/sharing/social-publishing-failed"}]},{"group":"Playlists","pages":[{"title":"Organize and share videos with playlists","sidebarTitle":"Create and share playlists","href":"/help/tips/organize-and-share-videos-with-playlists"},{"title":"Organize your playlists","href":"/help/sharing/organize-your-playlists"},{"title":"Organize playlists with groups","href":"/help/sharing/organize-playlists-with-groups"}]},{"group":"Viewer experience","pages":[{"title":"Viewer settings","href":"/help/sharing/viewer-settings"},{"title":"Change your video's thumbnail","href":"/help/video-metadata/change-thumbnail"},{"title":"Comments","href":"/help/sharing/comments"},{"title":"Reactions","href":"/help/sharing/reactions"},{"title":"Generate a document from a Tella video","sidebarTitle":"Generate a document","href":"/help/sharing/document-generation"},{"title":"Adjust viewer playback speed","href":"/help/sharing/adjust-viewer-playback-speed"},{"title":"Change video playback quality","href":"/help/sharing/change-playback-quality"},{"title":"Does Tella add branding or a watermark to my videos?","sidebarTitle":"Branding and watermarks","href":"/help/faq/tella-branding-on-videos"}]},{"group":"Download and export","pages":[{"title":"Export clips separately","href":"/help/export-videos/export-separate-clips"},{"title":"Export raw camera and screen recordings","sidebarTitle":"Export raw recordings","href":"/help/export-videos/export-raw-recordings"},{"title":"Download your video sped up or slowed down","sidebarTitle":"Change export speed","href":"/help/export-videos/change-export-speed"},{"title":"Change video speed for free","href":"/help/export-videos/change-video-speed-for-free"},{"title":"Download SRT and VTT subtitle files","sidebarTitle":"SRT and VTT subtitles","href":"/help/export-videos/download-srt-vtt-subtitles"},{"title":"Export a timelapse video","href":"/help/export-videos/timelapse-video"},{"title":"Generate an animated GIF from your video","sidebarTitle":"Animated GIF","href":"/help/sharing/generate-an-animated-gif-from-your-video"},{"title":"Compress videos for Discord and email","sidebarTitle":"Compress for Discord and email","href":"/help/tips/compress-videos-for-discord-and-email"},{"title":"Export or download fails, errors out, or gets stuck","sidebarTitle":"Export fails or gets stuck","href":"/help/export-videos/export-or-download-fails-or-stuck"}]},{"group":"Embed","pages":[{"title":"Customize embed settings","href":"/help/sharing/customize-embed-settings"},{"title":"Domain restriction for embedded videos","sidebarTitle":"Restrict embed domains","href":"/help/sharing/domain-restriction-for-embedded-videos"},{"title":"Embed Tella videos in email","href":"/help/embed-videos/embed-tella-videos-in-email"},{"title":"Embed Tella videos in Notion","href":"/help/sharing/embed-tella-videos-in-notion"},{"title":"Embed Tella videos in Framer","href":"/help/sharing/embed-tella-videos-in-framer"},{"title":"Embed Tella videos in Circle","href":"/help/sharing/embed-tella-videos-in-circle"},{"title":"Embed Tella videos in Google Docs, Sheets, and Slides","sidebarTitle":"Google Docs and Slides","href":"/help/embed-videos/embed-tella-videos-in-google-docs-sheets-and-slides"},{"title":"Embed Tella videos in Mintlify","href":"/help/embed-videos/embed-tella-videos-in-mintlify"},{"title":"Embed Tella videos in Linear","href":"/help/integrations/embed-tella-videos-in-linear"}]}]},{"group":"Library","pages":[{"group":"Organize your videos","pages":[{"title":"Sort, filter, and switch views","href":"/help/tips/sort-filter-and-view-videos"},{"title":"Search your videos","href":"/help/tips/search-your-videos"},{"title":"Organize your videos with tags","href":"/help/account/video-tags"},{"title":"Bulk select videos","href":"/help/account/bulk-select-videos"},{"title":"Batch export videos","href":"/help/export-videos/batch-export-videos"},{"title":"Delete a video","href":"/help/account/delete-a-video"},{"title":"How can I recover a deleted video?","sidebarTitle":"Recover a deleted video","href":"/help/account/recover-deleted-video"}]},{"group":"Import and migrate","pages":[{"title":"Upload existing videos","href":"/help/recording/upload-existing-videos"},{"title":"Batch upload videos from your computer","sidebarTitle":"Batch upload","href":"/help/faq/batch-upload"},{"title":"Migrate from Loom to Tella","href":"/help/faq/migrate-from-loom"}]}]},{"group":"Account and workspace","pages":[{"group":"Profile","pages":[{"title":"Reset your Tella password","href":"/help/account/reset-your-password"},{"title":"Set up two-factor authentication","href":"/help/account/two-factor-authentication"},{"title":"Change your Tella email","href":"/help/account/change-email"},{"title":"Can I change my email to an address already in use?","sidebarTitle":"Email already in use","href":"/help/account/change-your-email-to-one-that-already-exists"},{"title":"Switch from Google to email and password login","sidebarTitle":"Switch from Google login","href":"/help/account/switch-from-google-to-email-password-login"},{"title":"Which email am I logged in with on the Mac app?","sidebarTitle":"Mac app account","href":"/help/account/mac-app-account"},{"title":"Manage active sessions","href":"/help/account/manage-sessions"},{"title":"Delete your Tella account","href":"/help/account/delete-account"}]},{"group":"Preferences and notifications","pages":[{"title":"Set your preferences","href":"/help/account/preferences"},{"title":"Edit new recordings automatically","href":"/help/account/automated-editing"},{"title":"Does Tella have dark mode?","href":"/help/account/dark-mode"},{"title":"Notification settings","href":"/help/account/notification-settings"},{"title":"Set your transcription language","href":"/help/account/transcription-language"}]},{"group":"General","pages":[{"title":"Create a new workspace","href":"/help/admin/create-a-new-workspace"},{"title":"Join an existing workspace","href":"/help/admin/join-an-existing-workspace"},{"title":"Transfer videos to another workspace","sidebarTitle":"Transfer videos","href":"/help/admin/move-videos-between-workspaces"},{"title":"Delete a workspace","href":"/help/admin/delete-workspace"}]},{"group":"Members","pages":[{"title":"Invite a new member to your Tella workspace","sidebarTitle":"Invite a member","href":"/help/admin/invite-a-new-member-to-your-tella-workspace"},{"title":"Remove a member from your Tella workspace","sidebarTitle":"Remove a member","href":"/help/admin/remove-member-from-tella-workspace"},{"title":"Transfer workspace ownership","href":"/help/admin/transfer-workspace-ownership"}]},{"group":"Security","pages":[{"title":"Set default video permissions","href":"/help/admin/set-default-video-permissions"},{"title":"Default embed domains","href":"/help/admin/default-embed-domains"},{"title":"Set up SSO","href":"/help/admin/set-up-sso"},{"title":"SCIM provisioning","href":"/help/admin/scim-provisioning"},{"title":"Auto-connect Tella in Claude for your organization","href":"/help/admin/auto-connect-tella-in-claude"},{"title":"Is Tella SOC 2 compliant?","href":"/help/admin/soc-2-compliance"}]},{"group":"Branding and domain","pages":[{"title":"Customize your branding","href":"/help/admin/customize-your-branding"},{"title":"Add your custom domain","href":"/help/admin/add-your-custom-domain"},{"title":"Should I add another custom domain or create a new workspace?","sidebarTitle":"Another domain or a new workspace?","href":"/help/admin/custom-domain-or-new-workspace"},{"title":"Set default CTA buttons for your workspace","sidebarTitle":"Default CTA buttons","href":"/help/admin/cta-button"}]},{"title":"Refer and earn","href":"/help/referrals/refer-and-earn"}]},{"group":"Billing and plans","pages":[{"group":"Plans and trials","pages":[{"title":"Plans and pricing","href":"/help/introduction/plans"},{"title":"Subscribe to a Tella plan","href":"/help/billing/subscribe-to-a-plan"},{"title":"Apply a promo code","href":"/help/billing/use-a-promo-code"},{"title":"How do Credits work?","href":"/help/billing/ai-credits"},{"title":"What uses credits?","href":"/help/billing/what-uses-credits"},{"title":"How does the 7-day free trial work?","sidebarTitle":"How the free trial works","href":"/help/billing/how-the-free-trial-works"},{"title":"Can I extend my free trial?","href":"/help/billing/extend-free-trial"},{"title":"Apply for Tella for Education","href":"/help/billing/apply-for-tella-for-education"},{"title":"Apply for Tella for Good","href":"/help/billing/apply-for-tella-for-good"},{"title":"Do you have any storage or bandwidth limits?","sidebarTitle":"Storage and bandwidth limits","href":"/help/faq/do-you-have-any-storage-or-bandwidth-limits"}]},{"group":"Payments and invoices","pages":[{"title":"Understanding your Tella bill","href":"/help/billing/understanding-your-bill"},{"title":"Download past Tella invoices","href":"/help/billing/download-tella-invoices"},{"title":"Add billing details to your invoice","sidebarTitle":"Billing details on invoices","href":"/help/billing/add-billing-details-to-invoice"},{"title":"Why does my workspace show as unpaid?","sidebarTitle":"Workspace shows unpaid","href":"/help/billing/workspace-shows-as-unpaid"}]},{"group":"Change or cancel your plan","pages":[{"title":"Switch between monthly and annual billing","sidebarTitle":"Monthly or annual billing","href":"/help/billing/switch-billing-interval"},{"title":"Switch between Tella Pro and Premium","sidebarTitle":"Switch Pro and Premium","href":"/help/billing/switch-between-pro-and-premium"},{"title":"Can I pause my Tella subscription?","sidebarTitle":"Pause your subscription","href":"/help/billing/pause-subscription"},{"title":"How do I cancel my subscription?","href":"/help/billing/how-do-i-cancel-my-subscription"},{"title":"What happens when my Tella subscription ends?","sidebarTitle":"When your plan ends","href":"/help/faq/what-happens-when-my-tella-subscription-ends"},{"title":"Refund policy","href":"/help/support/refund-policy"}]}]},{"group":"Integrations","pages":[{"title":"Integrations","href":"/help/integrations/overview"},{"group":"Connections","pages":[{"title":"Use your ChatGPT or Claude plan with the Tella Agent","href":"/help/integrations/use-your-chatgpt-or-claude-plan"},{"title":"Linear integration","href":"/help/integrations/linear-integration"},{"title":"Create GitHub issues from generated documents","sidebarTitle":"GitHub integration","href":"/help/integrations/github-integration"},{"title":"Notion integration","href":"/help/integrations/notion-integration"},{"title":"Save a generated document to Intercom","sidebarTitle":"Save documents to Intercom","href":"/help/integrations/save-generated-documents-to-intercom"},{"title":"Save a generated document to Plain","sidebarTitle":"Save documents to Plain","href":"/help/integrations/save-generated-documents-to-plain"},{"title":"Save a generated document to Pylon","sidebarTitle":"Save documents to Pylon","href":"/help/integrations/save-generated-documents-to-pylon"},{"title":"Connect your social accounts","href":"/help/integrations/connect-social-accounts"},{"title":"Add saved images from Pinterest, Are.na and mymind","href":"/help/integrations/pinterest-arena-and-mymind"}]},{"group":"Apps","pages":[{"title":"Slack integration","href":"/help/integrations/slack-integration"},{"title":"Intercom integration","href":"/help/integrations/intercom-integration"}]},{"group":"Automation","pages":[{"title":"Connect Tella with Zapier","href":"/help/integrations/connect-tella-with-zapier"},{"title":"What can the Tella Zapier integration do?","sidebarTitle":"Zapier triggers and actions","href":"/help/integrations/actions-and-triggers-available-in-tella-zapier-integration"},{"title":"Turn Tella videos into help articles with Zapier","sidebarTitle":"Help articles via Zapier","href":"/help/integrations/automate-help-center-article-creation-from-tella-videos-using-zapier"}]},{"group":"AI agents and API","pages":[{"title":"Tella MCP Server","href":"/help/integrations/mcp-server"},{"title":"Publish to social media with the API or MCP","href":"/help/integrations/publish-with-the-api-and-mcp"},{"title":"Public API and webhooks","href":"/help/integrations/public-api-and-webhooks"},{"title":"Create and manage API keys","href":"/help/integrations/api-keys"},{"title":"Does Pro include API and MCP access?","sidebarTitle":"API and MCP on Pro","href":"/help/faq/does-pro-include-api-and-mcp"},{"title":"Set up webhooks","href":"/help/integrations/set-up-webhooks"}]},{"group":"Auto Capture","pages":[{"title":"Record with AI agents using Auto Capture","sidebarTitle":"Record with AI agents","href":"/help/integrations/auto-capture"},{"title":"Get started with Auto Capture","href":"/help/integrations/auto-capture-get-started"},{"title":"Auto Capture example prompts","href":"/help/integrations/auto-capture-example-prompts"},{"title":"Let Auto Capture sign in to your product","href":"/help/integrations/auto-capture-credentials"},{"title":"Let Auto Capture past your firewall or bot protection","href":"/help/integrations/auto-capture-site-access"},{"title":"Is Auto Capture safe to give my sign-in details?","href":"/help/integrations/auto-capture-security"},{"title":"Make videos for your help articles with Auto Capture","href":"/help/integrations/auto-capture-help-center-videos"}]}]},{"group":"Troubleshooting and support","pages":[{"group":"Audio and camera problems","pages":[{"title":"Why do I see the 'no sound' warning?","sidebarTitle":"'No sound' warning","href":"/help/troubleshooting/why-do-i-see-the-no-sound-warning"},{"title":"Why can't I click the Record button?","sidebarTitle":"Record button greyed out","href":"/help/troubleshooting/cant-click-the-record-button"},{"title":"Fix pops and loud noises in your audio","sidebarTitle":"Audio pops and noises","href":"/help/troubleshooting/my-video-has-audio-issues-big-noises-or-pops"},{"title":"Audio and video are out of sync","href":"/help/troubleshooting/audio-and-video-out-of-sync"},{"title":"Fix audio sync for XLR microphones","sidebarTitle":"XLR mic audio sync","href":"/help/troubleshooting/fix-audio-sync-for-xlr-microphones"},{"title":"Debug camera and microphone issues","sidebarTitle":"Debug","href":"/help/support/debug-camera-and-microphone-issues"}]},{"group":"Recording and upload problems","pages":[{"title":"iPhone not connecting to Tella","href":"/help/troubleshooting/iphone-not-connecting-to-tella"},{"title":"Not enough browser storage to record","sidebarTitle":"Not enough browser storage","href":"/help/troubleshooting/not-enough-storage-to-record"},{"title":"Browser storage isn't working","href":"/help/troubleshooting/browser-storage-not-working"},{"title":"Recover a cancelled or errored recording","sidebarTitle":"Recover a cancelled recording","href":"/help/recording/recover-a-cancelled-recording"},{"title":"Where is the video I just recorded?","sidebarTitle":"Can't find my recording","href":"/help/troubleshooting/cant-find-my-recording"},{"title":"Why is my video taking so long to upload?","sidebarTitle":"Slow upload","href":"/help/troubleshooting/why-is-my-video-taking-so-long-to-upload"}]},{"group":"Mac app","pages":[{"title":"Can't record on Mac? Check your permissions","sidebarTitle":"Mac permissions","href":"/help/mac-app/cant-record-on-mac-check-screen-camera-and-mic-permissions"},{"title":"Why do I see the low disk space warning on the Mac app?","sidebarTitle":"Low disk space (Mac)","href":"/help/mac-app/mac-app-low-disk-space-warning"},{"title":"Why can't I edit my Mac app recording?","sidebarTitle":"Can't edit Mac recording","href":"/help/troubleshooting/cant-edit-video-recorded-with-mac-app"}]},{"group":"Windows app","pages":[{"title":"Can't record on Windows? Check your permissions","sidebarTitle":"Windows permissions","href":"/help/windows-app/cant-record-on-windows-check-camera-mic-permissions"},{"title":"Low disk space in the Windows app","sidebarTitle":"Low disk space (Windows)","href":"/help/windows-app/windows-app-low-disk-space-warning"},{"title":"Get logs from the Windows app","href":"/help/windows-app/get-logs-from-the-windows-app"}]},{"group":"Editing and playback","pages":[{"title":"Video slow to load or blank in the editor?","sidebarTitle":"Slow or blank editor","href":"/help/troubleshooting/video-slow-to-load-editor"},{"title":"Fix “Hardware acceleration isn’t available” in the editor","sidebarTitle":"Hardware acceleration isn’t available","href":"/help/troubleshooting/hardware-acceleration-isnt-available"},{"title":"Fix “Update your browser to use the editor”","sidebarTitle":"Update your browser to use the editor","href":"/help/troubleshooting/update-your-browser-to-use-the-editor"},{"title":"Fix “Your video preview stopped working” in the editor","sidebarTitle":"Your video preview stopped working","href":"/help/troubleshooting/video-preview-stopped-working"},{"title":"Fix “We couldn’t load your video preview” in the editor","sidebarTitle":"We couldn’t load your video preview","href":"/help/troubleshooting/couldnt-load-video-preview"},{"title":"Re-render a video in Tella","href":"/help/troubleshooting/rerender-video"},{"title":"Why won't my video play or load?","sidebarTitle":"Video won't play","href":"/help/troubleshooting/recorded-video-wont-play-or-unknown-error"}]},{"group":"Errors and sign-in","pages":[{"title":"I can't log in to Tella","href":"/help/troubleshooting/i-cant-log-in-to-tella"},{"title":"Something went wrong error","href":"/help/troubleshooting/something-went-wrong-error"},{"title":"Client-side exception error","href":"/help/troubleshooting/client-side-exception-error"},{"title":"Is Tella down? Fix 500 and \"crashed\" errors","sidebarTitle":"Is Tella down?","href":"/help/troubleshooting/is-tella-down-500-errors"}]},{"group":"Get help","pages":[{"title":"In-app support portal","href":"/help/support/support-portal"},{"title":"AI assistant","href":"/help/support/ai-assistant"},{"title":"How do I contact Tella support?","href":"/help/support/support-availability"},{"title":"Tella Community","href":"/help/support/tella-community"}]}]}]},{"tab":"Developers","pages":[{"title":"Developers","href":"/introduction"}]},{"tab":"Changelog","pages":[{"title":"Changelog","href":"/changelog"}]}]},"basePath":"","title":"Generate auto layouts - Tella","deploymentId":"dpl_53YqbBPsHdrqSGqXiWPGU7csRVod","buildId":"dpl_53YqbBPsHdrqSGqXiWPGU7csRVod","dynamics":["a74be98ba7"],"chunks":["zoom-image-lightbox-BVW4Axcm.js","lightbox-handle-r17bVUz3.js"]}